Showing posts with label Oil Painting. Show all posts

Monday, May 19, 2014

The Process: Editing As You Go...

I wanted to paint some hanging herbs and flowers, so I purchased what I needed at the grocery store and set up a still life in my studio. I tried various arrangements (about two hours worth) using props, vases, twine and multiple plants.


In the end, I decided to remove nearly everything that was on the table.


I began blocking in. I decided to cut a length of longer twine and wrap it around each bundle of herb and then suspend it across the drape. It was difficult to get the plants back in their proper order with the shadows in the correct place!!!


On the second day, when I arrived at my studio, all the plants were limp. At least I had one day of observing the fresh color and form on each plant. I took color notes from observing the actual still life as well as from photos I took on the first day. I chose to edit out the plants from the bottom, left side of the painting.


Notice how warm the light was on the still life set-up in the background. Eventually I switched out the warm light and replaced it with a more balanced, cooler light source. It presented the colors in a more natural way.


"Enduring Beauty"
26" x 36" oil on panel

Saturday, April 26, 2014

Blue Vase
11" x 14" oil on panel
Available

To make our Thanksgiving Day dinner festive, my sister-in-law had placed a vase of  yellow chrysanthemums on her kitchen counter. The day before, my father had passed away and I was feeling a little melancholy. When I saw these bright flowers, they really lifted my heart! I decided to paint the memory!

Tuesday, April 8, 2014

Hyacinth Study

Hyacinth Study
11" x 14" oil on panel
Available

This painting was a study for a larger version (posted on this website 3-10-14).


Monday, April 7, 2014

Echeveria

Echeveria
8" x 8" oil on panel
Available

I was eating breakfast at a classy little restaurant in Sugar House (Finn's) when I noticed this frosted glass square filed with succulents.  The pot was only 3" across and the salt and pepper shakers were taller than the arrangement.

I couldn't resist painting it.


Thursday, April 3, 2014

Star Magnolia

Star Magnolia
8" x 8" oil on panel
Available


Magnolia is an ancient genus. Appearing before the bees arrived! The blooms 
appear on the twigs with nothing else...not even leaves! Strange looking.

Primitive.


Sunny-side Up

Sunny-side Up
11" x 14" oil on panel
Available

For me, sunflowers portray the relentless heat of summer.
One can almost smell their warmth!


Monday, March 31, 2014

Bluebells

Bluebells
6" x 6" oil on panel
Available

I loved capturing the tiny drops of dew on this delicate flower.  

Monday, March 10, 2014

Daffodil


Daffodil
6" x 6" Oil on Panel
Available

Rock Daisies


Rock Daisies
11" x 14" Oil on Panel
Available

I photographed these flowers while hiking in Arches National Park. 
My husband was patient while I stopped to take MANY pictures along 
the way. It amazes me that these daisies don't wilt in the heat.

Purple Hyacinthe


Purple Hyacinth
16" x 16" Oil on Panel
Available

I got down on my belly to photograph this bloom. The aroma was powerful and the back lighting was spectacular. There were lots of different greens. What fun!

Tuesday, March 4, 2014

Variegated Tulip

"Variegated Tulip"
6" x 6" Oil on Panel
Available

Fire Berry

"Firethorn"
6" x 6" Oil on Panel
Available 

While hiking up Millcreek Canyon (Salt Lake City, Utah), I snapped a photo of these berries. Some people call them Fire Thorn while others refer to them as Pyracantha.  We had a hedge of these berries in the backyard of the home where I grew up. I usually managed to fall into the hedge at least once a year. Ouch!  Good times...

Sunburst

"Sunburst"
12" x 12" Oil on Panel
Available

Deep Rose


"Deep Rose"
6" x 6"
Oil on Panel
Available

Backside - another view


"Backside"
6" x 6" Oil on Panel
Available

While deciding how to light this flower and select the angle from which it would be painted, I noticed how interesting the backside was. There you have it! 

Sunday, February 23, 2014

The Secret of Palette Knife Painting

Surprisingly, palette knife painting is similar to making a peanut butter sandwich! If you want to pile the paint on, flatten your knife and smear the paint across your canvas. To remove paint, angle your knife and scrape away!
Palette knife painting generally does not replicate reality, rather it articulates shapes and colors in a broad, simplified way. By not telling too much of the story (leaving out the details), this abstracted way of applying paint allows viewers to assign their own interpretation to the subject of the painting. It keeps both the artist and the viewer in a more emotional, expressive state. 


Saturday, we experimented at the Palette Knife Workshop with our knives and practiced various techniques for painting texture. Alternately, I demonstrated a few techniques and then the ladies went into the teaching room to try them out.


We learned to "turn form" by changing the hue and value of our paint strokes (nothing kills a painting like over blending). By scraping off unwanted paint, we corrected the dull areas of our paintings and applied a new hue or value onto our canvas.


Using the right knife proved to be helpful. A flat knife is a real knuckle dragger while an angled knife lets your fingers grip without hanging down onto the painted surface.


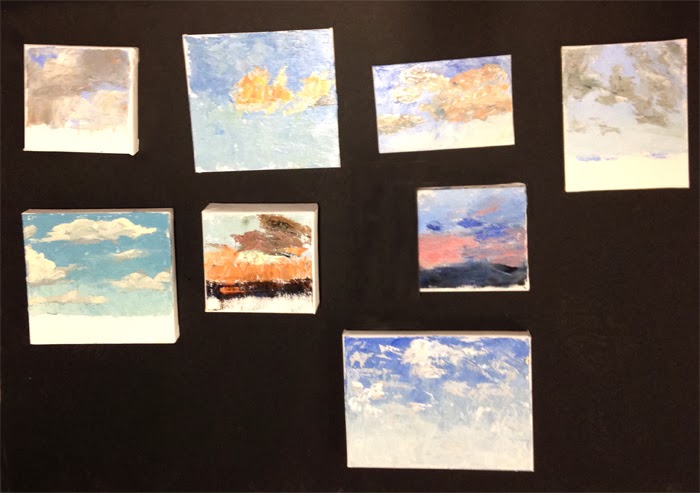
Next, we practiced rendering the gradual transitions of the sky. We divided the sky into two parts: the smooth "atmosphere" and the lumpy "clouds" that float in it. 


 Learning to differentiate between the smooth, quiet texture of the atmosphere and the greater noise of the clouds took some practice, however each student successfully created a painting.

The abstract landscapes proved to be a greater challenge! Without looking at a reference, each student was instructed to paint from their heart and render a final piece. Aside from a few of us wanting to tear our hair out, this part of the workshop was the most inspiring.


A few tips and pointers:

  • To start off, draw a few lines with a 
small brush to indicate where you 
will be placing the shapes in your 
composition. Take the time to get it 
right.
  • Work toward creating color and 
texture instead of expecting a 
perfect rendition of your subject 
matter. Try not to “over think” or 
analyze too much.
  • Pre-mix some of your colors. Leave them “marbleized” for greater interest. Go ahead and mix colors right on your canvas.
  • Keep your knife clean. Wipe it off between colors.
  • When you paint with a knife: SIMPLIFY your subject matter. Learn to see general 
shapes and large masses of color.
  • Work dark to light...thin to thick.
  • Don't over blend.
  • It’s often effective to apply the paint in one direction then scrape over the passage in 
the opposite direction.
  • Accidents and irregularities = interest. Knife painting is more loose than brush 
painting. Don’t be hard on yourself when your painting looks too wild. You’ll learn to tone it down. It just takes a lot of practice!
  • Think about edges and use a variety: hard (crisp), firm, soft and lost edges. There is 
no hard-fast rule about edges. Sometimes soft edges can make distant objects 
appear farther away, but too many soft edges can turn your background into a foggy 
mess!
  • Look for unwanted patterns and interrupt them with a lost edge or a new color.
  • Watch the size of the textures that you create. Generally, objects in the distance have little or no texture while subject matter in the foreground has larger, more contrasting texture.
  • Think in layers. “What’s behind or underneath?”


Miscellaneous

When painting with a knife you might need to turn your canvas to get the right angle for placing a stroke. I have learned to turn my wrist or hand, or even use my other hand to articulate a stroke.


The stroke of a knife does not produce uniform edges.  One side of your stroke might have a hard edge while the other side might have a softer edge. Sometimes you can place a new knife stroke over part of the old one, and sculpt it into the exact shape you want. Learning to manipulate your knife can be tricky, but it’s rewarding when you get it right.

The strokes from a knife are more bold than those from a brush. The flat surface of a knife stroke usually makes the color of the pigment read with more intensity than a brush stroke with it’s many bristle marks. Also, the thickness of a few well-placed knife strokes can give your painting a three dimensional feel. 

Experiment with your palette knife. Try combining your brushwork with lively knife work and see what happens.

Have some fun!    


Wednesday, September 18, 2013

Spring City, Utah - A Real Sweet Spot!


 Labor Day weekend I traveled to Spring City (central Utah) to participate in a "Quick Paint." Every year Spring City sponsors an arts festival from Wednesday through Saturday with various painting competitions for artists. Each day each artists selects a spot and completes paintings that are hung in a local gallery (on Main Street). At the end of each day the work is judged and awards are given. The work stays in the gallery and by the end of the week, the gallery is full and the paintings go on sale. 

 I chose to paint in the Saturday morning event: "Quick Paint."


 After checking in, I drove around Spring City to scope out a place that seemed appealing. The rural town is verdant with lots of meadows and tall trees. The morning echoed with the bellowing of cows and the occasional crow of a rooster. After driving for several minutes, I finally spotted a pretty yellow house with a lovely garden - and set up my easel.


 When my painting was finished, I drove 2 minutes away to the park behind the church where I signed in for the silent auction. I priced my painting, registered it then hung it on the designated pegboard.


 People began to gather, artists chatted and laughed and the patrons viewed the work.


 My painting never did receive a bid, but that often happens in the art world. Eventually, someone could connect with my painting and it could be love at first sight!