Showing posts with label Sketching. Show all posts

Sunday, March 15, 2015

Shake It Up!


Shake it up! Take a risk. Paint something different. Even though you may be a pretty good artist, why not try something new and keep your work fresh?

I decided to "shake it up" by taking a figure drawing class from Bryce Billings. There was nothing more humbling than discovering that I was rusty in the drawing department. I had forgotten what it was like to be a student again.

Oh, yeah! I have been drawing in my sketchbooks - but not the refined stuff. Just quick doodles and gesture drawings using a pencil. Seriously, I forgot how to draw and blend with charcoal. There's nothing like experiencing the bottom rung of the ladder again.  Ha-ha!


Bryce's classroom is conveniently located about 6 blocks from my art studio. It has a friendly atmosphere that is conducive to learning. Not only can Mr. Billings draw well, but he is a superb teacher. Below is a shot of some of his works. Check out his Website.


My classmates are diverse, hardworking and willing to take on the challenge of improving their work. One of the nice things about this class is that Bryce hires live models. It's easier to render a drawing that looks three-dimensional when there is a living person sitting in front of you.


When the students demonstrate proficiency at drawing, seeing shape and getting their values correct, they will begin to paint. I can hardly wait! Below, Bryce is showing Eileen some pointers about painting.


Here are some homework exercises from my sketchbook. Even though they are not perfect, they have already improved my art skills. 


Step out of your comfort zone (Sign up for something really scary - like figure drawing). Or if you're in my art class (you probably are if you're reading this), ask me about one of the optional student assignments or paint a subject that you've never tried before. 

What are you waiting for? Get going!


Saturday, January 19, 2013

Create a Sketchbook You Can Be Proud Of

It all starts with the first page.

When someone opens your sketchbook, you want to catch their eye. For me, my title page is the hook. The thing that makes the viewer want to keep going...to look at the rest of my drawings.


The title page of my sketchbook is like the smell of fresh bread wafting from a bakery. It beckons the viewer to enter and sample the goods!
            
                                                Make your title page interesting. Better yet, make it amazing!


Each time you begin drawing in a new sketchbook, turn past the first page (leaving it blank) and begin your sketch on the second page. Later, when you have taken some time to think about how to make your title page special, go back and paint or draw on it.

Usually, my title page is the third or fourth page that I write on, however sometimes it's the last page I complete. It all depends on the inspiration that comes to me. Below is an example of a title page that I painted in small sections over a period of weeks. 

At first I didn't think about making my title pages look special. My artwork was pretty simple.


Then the idea of turning my title page into a visual appetizer came to me, so I jumped on it. 

Now it's a favorite part of my sketchbook. 


There are lots of ways to get creative. You don't have to limit yourself to drawing or painting. You can experiment with multimedia such as photography, stenciling or collage.


Make sure your full name or website name appears somewhere on the title page.  That way if you misplace your sketchbook or lose it altogether (Heaven forbid), the person who finds it can look up your contact information and return it to you.


Of course, filling your sketchbook with drawings and paintings is important too. A title page without a book - is no story at all!  So, get started! Fill up one book then begin another. What should you draw? Draw things that are near and dear to you. Draw your dog, your room, what you ate for lunch. Whatever you want!

The more you practice, the more you will improve!


Sunday, December 30, 2012

Tips About Sketching People

 
When is the last time you sat and drew a picture that had people in it?

I see.

You don't do people.

Well, don't be afraid. Jump in and draw. 

Keep a sketchbook in your purse or briefcase and whip it out when you are sitting in the doctor's office or when you are waiting to have the oil in your car changed. 

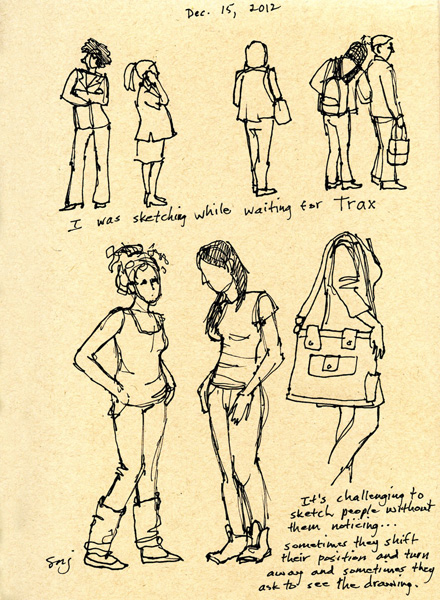
When I have a spare moment (it happens on occasion), I take out my sketchbook and start drawing.  Not only is it therapeutic, but it's challenging to capture the gesture of people - especially when you only have a few minutes to work.  


Sometimes, when I'm drawing a picture of a person, it's a matter of seconds before they move or shift their body position! When that happens, I simply start again.  I have a page in one of my sketchbooks that has a drawing of a two-year-old. It's really a compilation of six heads in various positions.  He moved around so much that I never had time to sketch the rest of his body.


When I draw, I like to use a sharpie marker. It's cleaner than using graphite (pencil) and because I can't erase my errors, drawing with permanent ink causes me to ignore my mistakes. It's a quick capture.  You are forced to draw continuously and the moment your pen hits the paper, you have a committed mark. No turning back.


Let's talk for a minute about mistakes.

If you look at the above drawings, you will see many mistakes - that's what I used to call them. Now, I don't even think about them...they're just there. For example, look at the boy seated with the laptop computer. You can see the computer through his leg.

Big deal.

Notice the guy seated in the round chair. His head is composed of two perpendicular ovals and a triangle nose. Who cares? Seriously. Sketching is all about the joy of drawing people. 
Take the challenge. 
Sit down somewhere and begin to draw.  Sketching is like everything else. You get better with practice. Here are some handy tips:
  • People are made of shapes. First, learn to see them - then draw them. Squares, rectangles, circles, etc.
  • See relationships between the shapes.  How far is the triangle from the square? How far is it from the hip to the knee and from the knee to the ankle? Is the length similar?
  • Leave out the face. Anonymity has a certain universal appeal.
  • Go for the big stuff like legs, arms and torso. Leave out the details.
  • Keep a piece of blank paper underneath the page on which you are drawing so that the ink doesn't bleed through.
  • Draw on ONE side of your notebook page (not on both sides)
  • Practice. Draw anything: objects, landscape or even people.

On occasion people will be aware that I am sketching them. They usually shift their body position and turn away from me. Sometimes they walk over to see my sketch. Once in awhile they say, "It doesn't even look like me." 

You get all kinds of reactions. Try to respond to them politely.

Most folks don't mind if you draw them, but some do. If I am going to render a detailed sketch (one that takes more time than a quick gesture), I usually ask the person for permission before I begin.  Otherwise, be discreet and try not to let them see you staring. If your drawing turns out nicely, you can email the person a copy of it (get their email address). 

Don't be afraid of how your drawing looks and avoid comparing your work to other artists. Each artist has their own style; their own interpretation of what they are seeing.

Here's Picasso...

And Matisse...


You will have your own style too.  It's like a signature - unique and original.

Buy a small sketchbook and a good pen.  Keep them nearby so that when you have some time in your schedule, you can practice drawing people, or for that matter - anything!
Drawing images of people is daunting at first, but it's a learned skill that can be rewarding.
Mostly, sketching is just plain fun!

Why not try it and see what happens?


Tuesday, November 20, 2012

Illustrated Journal - What's Your Story?

An Illustrated Journal is similar to a diary but it usually has more pictures. Your journal can be a record of your adventures or travels.  You can use various media in an illustrated journal such as collage, sketching, painting, pasting, photos, and much more. It can be a statement about your life experience; what you think or how you feel. It can be public or private.  

It's about self-expression. 

Here's the title page in my new "sepia" journal:


Do you have to be an artist to create an illustrated journal?

No, anyone can make one! Usually the process of creating a visual record unleashes the artist in you. Consider yourself warned!


Last week I ate lunch at Paradise Bakery and thought I'd draw the chairs around me.  It was more complicated than I thought and the biggest chair turned out to be too short and wide...oh well, who is going to know?


Why should you journal?
It's a record where you can visually document your world. Journaling is a way to unwind, a meditation of sorts. It provides a wonderful outlet for your emotions and feelings.  Besides, your posterity will have a chronicle that is not only interesting to read but it will be beautifully illustrated.


What if you mess up?
There is no right way to do it.  No one will judge you, you're not going to receive a grade and there's no contest.  You simply will have an archive of your life as it truly is, mistakes and all.


So, what types of things do you draw into your journal?

Anything you want! 

The other day I gathered various objects from around my studio, placed them under a light source and drew the shadows that they cast. 


Here's a sketch of the skeleton in my studio.  
Her name is Anna...Anna Recksick (ha-ha).


This coat rack is on the wall of my studio where my students and I 
hang our paint smocks and aprons. 


When I make an entry in my journal, it doesn't have to be perfect. I can do a hasty sketch or a more thoughtful and elaborate drawing. You can even glue photographs onto the pages. That's the beauty of an illustrated journal - you can create whatever you want!


If you want to see more of my journal images, click on the "Artwork" tab of my website and then click "illustrated Journal" .

So, what are you waiting for? Get yourself a journal and get started!


Monday, September 17, 2012

Upcoming Illustrated Journal Outing!


This weekend on Saturday, September 22, 2012, join Susan N Jarvis Fine Art Studio for another one of our popular Illustrated Journal Outings. All of our Adult Art Workshops are held in beautiful Salt Lake City settings and this occasion is no different. Join us from 10:00AM to 1:00PM as we focus on our sketching and watercolor skills in gorgeous Millcreek Canyon.


Millcreek Canyon is situated in the Wasatch Mountains and is known as one of Salt Lake City’s most popular recreation areas. In our opinion, it is also one of the prettiest places to be in autumn. Here we will work on drawing, leaf stenciling, moving or standing water and painting negative space (seeing shapes).

We will be meeting in the parking lot of Dan’s Grocery (Olympus Cove), which is over by the “Ace Hardware” store at 10:00AM sharp so be sure to have all of your supplies packed and ready to go! For a full list of the supplies that you will need for this Adult Art Workshop, please visit the Workshops page of our website and click the link under the listing for this exciting Illustrated Journal Outing to Millcreek Canyon.

This event only costs $25.  Be sure to contact Susan N Jarvis Fine Art Studio today for more information on this great opportunity! We look forward to seeing you this weekend!

Sunday, August 26, 2012

People - Can You Paint Them in 60 Seconds?


At "This Is The Place Heritage Park," my students were asked to paint images of people as they walked back and forth along the street.  Oh, yeah. This proved to be a challenge!

Pedestrians don't hold still!

 
After a few rough attempts, my students began to get the hang of it. They drew the tilt of the trunk and shoulders first, blocked in the line of the legs, then dropped the head on last (heads, hands and feet of people in the distance should be small and delicate).

It was fascinating to note that even though we were observing the same people while they walked around the park, we each painted our images of them in a unique manner. It's like a signature; each person signs their name in an unmistakable way.


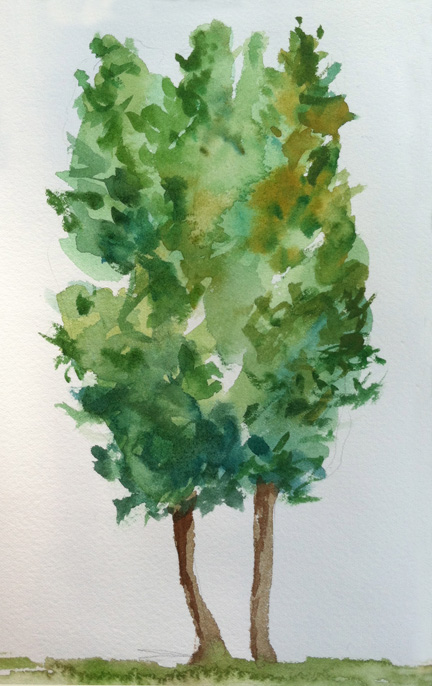
When we focused on painting trees, our individual styles became apparent. Some of our paintings had gentle pastel colors and soft brush strokes while other students chose to use brighter colors with stronger brush passages.


We decided that one style is not better than another - they are just different from each other! Each style reflects the artist's individual interpretation and personality.


The whole point of plein-air painting is to get outside and have a first-hand, real life experience of your subject. Use your senses. Smell the flowers, touch the leaves and feel the sunlight. You can better paint something if you are familiar with it. Of course there is the occasional storm, mosquito or bug and even the occasional "tourist pest" (the kind that doesn't stop talking and bothers you with too many questions). 

But hey, how can you accurately portray nature without having an experience of it?